Monday, June 24, 2013

Last Hurrah to Old Glory


Having more patriotic decorations has been very important to me this year.  I have boxes full of Fall, Halloween, thanksgiving, Christmas, Valentines, St Patricks Day, Easter, Spring and even Summer decorations.  But for those many patriotic holidays during the summer months, my decorations were just pathetic.  

I have been busy crafting away the last few weeks.  See the 2 pervious posts for the deco mesh flag wreath and the 2x4 block flag.  I think they are really cute.  Well, this will be my last project for this year as my family is moving to a new place in August and I need to get decluttering and packing this family!

I have been several different variations on this project and took several and combined them into what I created. Here it is:  

What do you think?  I love the weathered look!  What to make your own set?????  Here's how:

How to:  This is the tutorial I used: Click here >> Firecracker Tutorial

My changes and additions: 
  • My blocks were cut at 7 inches, 5 1/2 inches and 4 inches.
  • On the Red block, I used painter's tape and painted the white and then reversed and did the red
  • The stars and the USA are stenciled using my favorite font and press n seal paper.  
    • See the previous post for directions.  
  • To distress: I sanded the edges and face with my hand sander.
  • Then I used watered down brown paint and a strip of white cotton fabric and rubbed the paint on and then of.
  • I used a clear coat to seal it all up!
  • I had some rope twine leftover from a project, SEVERAL YEARS AGO, so I used that for the wick.
  • I used a drop of wood glue down the hole and then stuck the twine down the hole!


Cost to do this project:
The 2x2x8 piece of would was $2.09.  This will do 5 sets if you use the same measurements I did.
Paint, stencil and wick was all free from my stash.  My little set was .42 cents!  SCORE!!!!!!!

Here is a few of the projects I found on Pinterest that inspired this project.  
Firecracker Set #3

Happy 4th of July, Ya'll!
                                  

Friday, June 21, 2013

Patriotic - the More, the Better!

I have been very discouraged by the news over the last few months.  I feel like I live in a country where we have lost our patriotism.  I am one person and cannot change the world, but I can change my world.  My goal this summer was to have more decorations in my house that are patriotic.

I didn't start with very much.  A few sets of red, white and blue lights, a few flag candle sticks and a few paper stars.  Pathetic, right????  Well, I set off on Pinterest to find a few ideas and boy did I find a few.  My first project was a wreath!  See the previous post!  I think it turned out great!

My next projects were not projects at all.  I was in the grocery store of all places and they had 4th of July stuff on sale!  Score!  The 3 words signs were $1.79 each.  The metal firecracker was $2.99 and the God Bless America sign was $2.49.  Can you say cheap and in my budget!!!!!!  AWESOMESAUCE!


After my little shopping spree, I still felt like I needed a little something more!  With kids being home, it is hard to go to the craft store so I was thinking about what I could do and it came to me!!!!!  I bought 2 2x4s last summer to do a block flag project and never got around to it.  I had the wood, the paint and the stars!  So off to break out the circular saw I got for my birthday in 2011 that I have been too afraid to use.  I got brave and fired it up and cut my wood.  1 2x4 did 3 flag sets and then I had 3 pieces left and did the USA block set.

Supplies: 
1 2x4 piece of wood - $2
Saw to cut wood
Burlap Ribbon - $4 which was 1/2 off on sale
Package of 4 -2 inch stars - $2.47
Red, white, blue and brown paints - Under $1 each
Sand paper and/or hand held electric sander - hand on hand
Foam paint brushes - had on hand
Hot Glue gun to stick on the star - Had on hand

Cost of project: under $10 for 3 sets of the flags and 1 set of the USA blocks

How to:  This was my inspiration and also a great tutorial.  Click here >>> Flag Blocks

What I did different from the tutorial:  
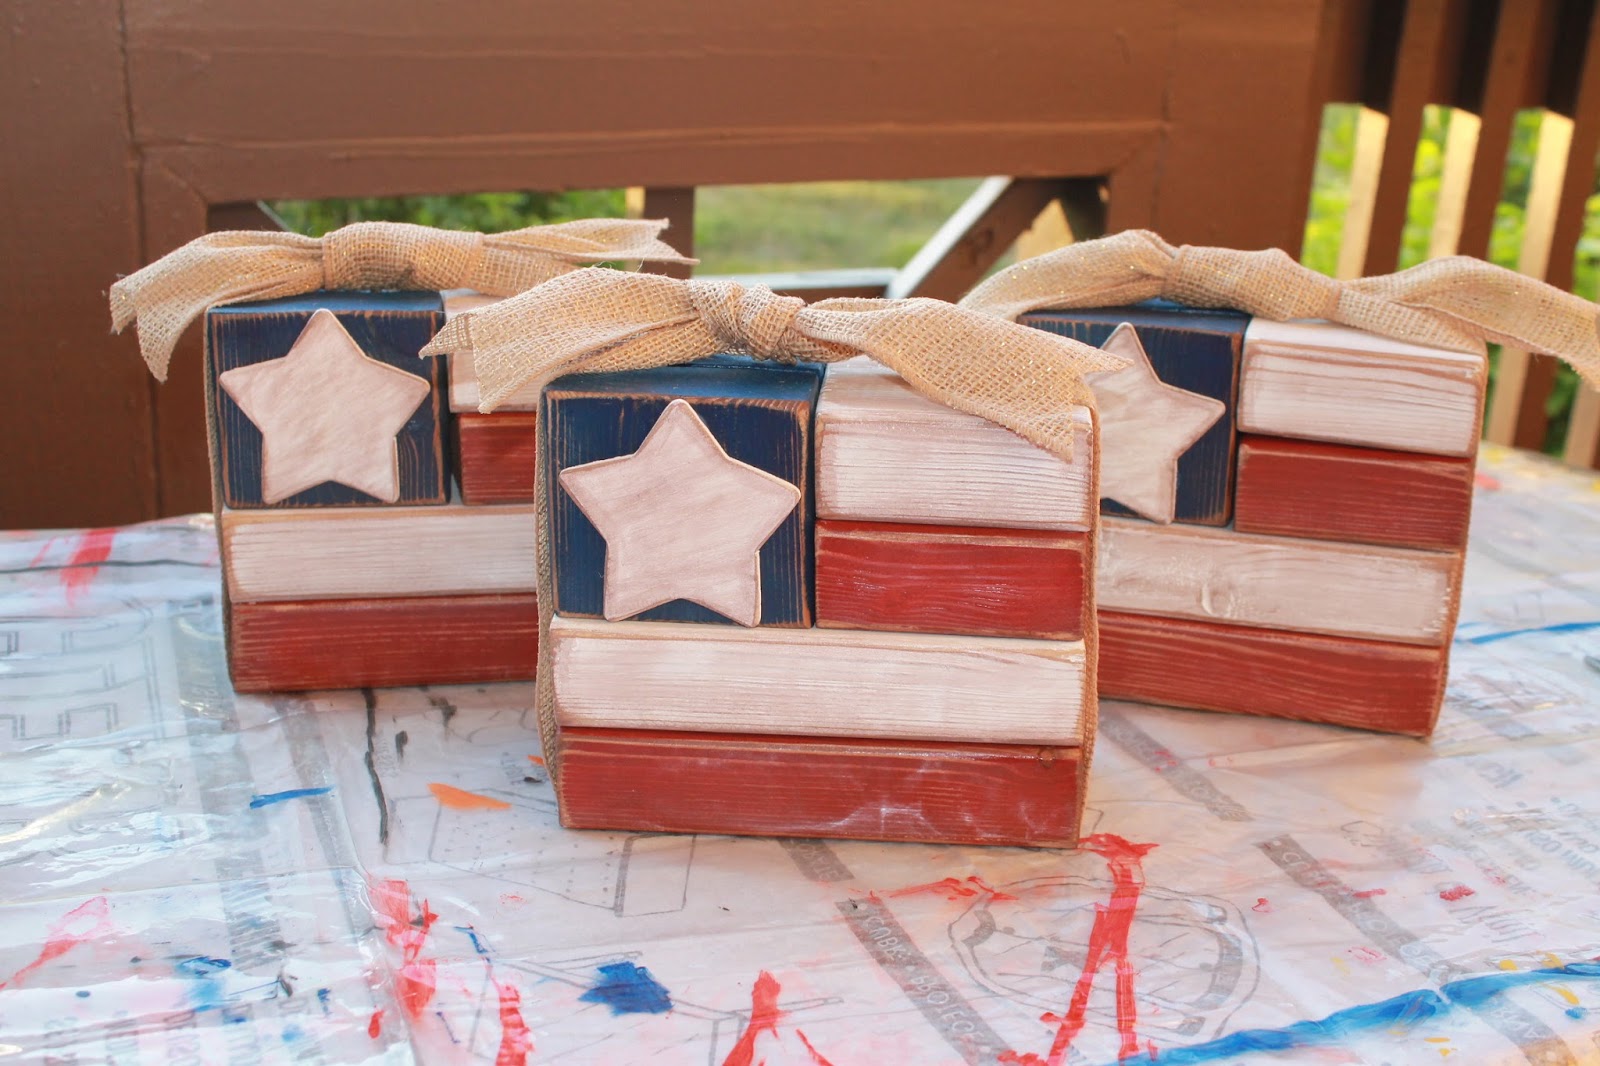
1. The block that is painted blue, I cut it at 3 inches so it would not be taller than the white block. 
2. I painted all sides on by blocks to seal them in. 
3. I used watered down brown paint to give a more aged look after I sanded the painted blocks.  You use an old cloth or papertowel and rub a small amount of the paint onto the block and then rub it off.  You could also use stain and it will rub off better.
4. I used wooden stars instead of paper so that it would last through the years.
5. I used a clear coat sealer on all sides to protect from weather and children!
6. I used burlap instead of ribbon because I like the look of it!  
7. It did take longer than 30 minutes, but I did add in extra steps!  Even if I did just want she did, it would have taken me longer!  I guess I am a slow poke!!!!!

Here is the picture of the 3 completed sets!  Cute, Right?????

USA Blocks

These are super easy!  I don't really have a tutorial per say, but I just cut the wood to 3 1/2 inches and painted them the same time/way as I painted the flag blocks above.  

The Stencil of USA:  I found my favorite font on my computer and made the letters 3 inches tall and printed them out.  I used Press 'n Seal Wrap and pressed it over the letters.  Using an exacto knife, I cut the letters out.  I peeled the paper off the Press 'n Seal and then put the Press 'n Seal onto the wood blocks.  Then you dab or dot the paint onto the stencil, let it dry for a few minutes and then peel the Press 'n Seal off.  And then you have stenciled letters!!!!


Sand and then distress with the brown paint and water mixture.  Seal and you are done!  


I am still wanting to do a few more projects.  Here are a few I am thinking about: 


Happy 4th of July!!!!!!


Deco Mesh Patriotic Flag Wreath

Posting this was an after thought so there are no how to pictures, but I will post links to other blogs where I got the idea and the tutorial on how to make it myself.


My design inspiration: Click here >>>Flag Wreath Inspiration
I loved this wreath and set off to make one on my own!  When I got to Hobby Lobby, I found the heart shaped wreath and thought that would be cute!  My Hobby Lobby was out of the red and white stripe ribbon so I went with a roll of each of the solid colors.  I like the inspiration version, but I love my version!

Supplies: I got all of my supplies at Hobby Lobby, my craft store of choice!  If you watch the sales, the deco mesh will be on sale for 50% or you can go 3 days in a row and use your 40% coupon.  Your choice.  Note: Week of June 17-21, 2013 it is on sale for 50%.
3 rolls of 6 inch Deco Mesh Ribbon - $5.99 per roll
1 Heart Shaped Wire Form - $2.47 (in the floral area)
1 package or roll of thin floral wire - had this from a project - probably less than $3
Package of tiny stars - package of 10 were $1.47
White craft paint - hand on hand but under $1
Wire Cutters - if you wire is thin a pair of scissors will work
Pair of Scissors

Cost of Project: Under $25 and if the ribbon is on sale that drops the price to $14.  Coupons will save you more!

How to: This link is a great tutorial.  It is actually for a Christmas Wreath which was my first project with Deco Mesh!  That one turned out beautiful too!  LINK HERE>>>> Wreath tutorial.

HOW TO CHANGES: You will notice in the tutorial they use a greenery form.  For this Flag Wreath, you are using a wire form.  What I did was make a few loops, tying it down with the wire and then would push them together to make the scrunchy look.  I hope that makes sense?!?!?!?!  Tie, push & scrunch, and tie together - REPEAT!!!!!!

If you look at the back you can see where tied 3-4 loops together as I went along.


For the Blue, I did loops to fill from the top center until I got to the first support divider which is about 1/2 way down the left side.  For the red and white stripes, I did 4-5 loops per color and alternated. If you can see in the picture above, I did not cut the white or red ribbon.  I just weaved it along the back as I went along.  


To finish this off, I used a pipe cleaner and made a hanger so that I could hang my new creation in my front entry.

This project took about 4 hours to complete!  It is pretty easy and almost impossible to mess up!  Deco Mesh is a super easy product to work with!  I love it!

I hope that you can follow this post and make your own.  You are welcome to ask questions in the comments and I will do my best to try to answer them.  


Tuesday, July 3, 2012

Grass is Greener and Red, White and Blue


I saw this picture on Pinterest today.  I could not find where it was originally posted so I googled it.  See the links below to see where I found the backdrop of my story.

My story.

Tomorrow is 4th of July or Independence Day.  It is a day that we are suppose to come together as a country and celebrate the freedoms the founding father's fought to create for its future generations. It is a day to spend time with your family, go to the main street parade, wave the flag proudly and eat america favorites from the grill.

As I have been on Facebook over the last few week days, I read many people saying that they are not into celebrating Independence Day this year because their freedom has been robbed of them.  Really?????

True, you are now going to be forced to buy health insurance and maybe you will have to pay higher taxes. Who knows! Many people believe there is a clown in the white house while many people think he is the best president since Abraham Lincoln. We are a country divided in politics, social correctness, religion, lifestyles, immigration, etc.

I know there are many American suffering right now.  There are people with no job or a job that does not pay all the bills, small businesses going out of business, food and gas prices going up, wildfires and droughts, flooding, tornadoes, hurricanes, lost homes, lost family members and the list goes on and on.

I guess what I am trying to say, is I know life is not great for everyone, but we, as Americans, are truly blessed to live in this country.  No reason to celebration our country's birthday?  Really???  If you live in this country you have more to be thankful for than most of the world could dream is possible!

On with my I posted the picture above.  I love this picture.  Grass!  How many of you have complained about mowing the grass in the last week?  I live in apartment so I do actually do the mowing, but I complain every time the crew that does the mowing comes.  They are loud and it is generally at 8am when I am trying to sleep.  Freshly cut grass also does a number on my allergies.

Grass, simple grass.  One soldier, Warrant Officer Brook Walker, missed the smell grass while deployed in Iraq in 2004.  So he asked his wife to send him grass seed and she did, and he went to work.  He grew a little plot of grass in the middle of the 120 degree dessert.  He watered it with a bucket from the bathroom 3 times a day, built an awning to shade it from the sun and used a pair of scissors to cut the grass.

So I say to those who don't think there is anything to be celebrated this year for Independence Day, I say stop and smell the grass and think, what would you miss if you were to move somewhere else or if this county found itself with a different form of Government?

grass
a car
being able to buy groceries whenever you want and whatever you want
indoor plumbing
clean water
a closet full of clothes
more shoes than any one person really needs
freedom to voice your opinion about politics and not being punished for it
being able to dress as you wish
women being free and not property of their husband
being able to vote
tv, internet, phones, cell phones, texting, pictures, facebook, pinterest, etc.
education
being able to have the number of children you want
freedom of speech
freedom to bear arms
property ownership
having the job that you choose
access to healthcare
recreational opportunities
religious freedom

I am thankful for these and many other freedoms!  So tomorrow, July 4th, 2012, I will be celebrating my country's Independence Day.  It maybe an imperfect place, but it is the land where all are free.  It is a land of opportunity.  It is a land of general love and brotherhood!

My God! How little do my countrymen know what precious blessings they are in possession of, and which no other people on earth enjoy! ~Thomas Jefferson

Happy Birthday, America!


http://seattletimes.nwsource.com/html/localnews/2002137465_iraqlawn01m.html
http://www.snopes.com/photos/military/grass.asp

Thursday, September 15, 2011

Caramel Dip


I love September! The kids go back to school, the weather cools down, and the fall colors are just so beautiful! I have a new favorite thing about September having lived in Washington State for 8 years - Apples!!!! Apples are so good in Washington! There are so many varieties! Some sweet, some tangy - all good!

A few years ago I was in charge of the Women's Activities at my church and we planned an Apple night. It was the best and a start to many cooking classes!

One of the recipes that was shared was Caramel Dip - something I had never been a fan of! It was so good it has changed my opinion. I will share it with you at the end!

Fast forward to today. Now I teach the 8 & 9 year old girls at my church and I am getting ready for my next activity. We are going to talk about apples and good nutrition! Apples are really the perfect food! So good for you and so yummy! The girls are suppose to bring a few different kinds of apples and we are going to taste them and see how each is different. Here comes the Caramel Dip, and peanut butter and nutella! Perfect dips for apples! I think this is going to be a great activity!

Here is the recipe!

Easy Caramel Sauce

from Cook's Illustrated and Kathryn Packer

(If you make the caramel sauce ahead, reheat it in the microwave or a small saucepan over low heat until warm and fluid. When the hot cream mixture is added in Step 3, the hot sugar syrup will bubble vigorously (and dangerously) so don't use a smaller saucepan.)

Makes about 1 1/2 cups

1/2 cup water 1 cup granulated sugar

1 cup heavy cream 1/8 teaspoon table salt

1/2 teaspoon vanilla extract 1/2 teaspoon lemon juice

1. Place water in heavy-bottomed 2-quart saucepan; pour sugar in center of pan, taking care not to let sugar crystals adhere to sides of pan. Cover and bring mixture to boil over high heat; once boiling, uncover and continue to boil until syrup is thick and straw-colored (syrup should register 300 degrees on candy thermometer), about 7 minutes. Reduce heat to medium and continue to cook until syrup is deep amber (syrup should register 350 degrees on candy thermometer), about 1 to 2 minutes.

2. Meanwhile, bring cream and salt to simmer in small saucepan over high heat (if cream boils before sugar reaches deep amber color, remove cream from heat and cover to keep warm).

3. Remove sugar syrup from heat; very carefully pour about one quarter of hot cream into it (mixture will bubble vigourously), and let bubbling subside. Add remaining cream, vanilla, and lemon juice; whisk until sauce is smooth. (Sauce can be cooled and refrigerated in airtight container for up to 2 weeks.)

Monday, July 4, 2011

A Wish!

Do you ever wish that you were good at something? I do! I know that I have the capability to do things, but I am not great or even good at most things.

I wish I had some kind of special talent. I wish I were one of those great mommy bloggers that seem to be able to write about anything because they seem to know everything. I really wish that somehow the things that I write helped someone or made a difference in someone's life. I wish a had a 1,000 followers!

I want to write a book, but about what? I am not an expert on anything, and I think I am humorous, but most people don't laugh when I crack a joke. I am not romantic and I hate politics. I would still love to write a book! Would you buy a book about a not so spectacular life of an ordinary mom???

I would love to be a photographer. I look at great pictures and think I can do that and then wonder why I can't get a picture of my kids without a glare on the glasses or a shadow cast on them on a sunny day! I try to get close ups of the flowers on my porch and they turn out to be a blurry mess! I even bought a fancy camera and I am very excited to get 3 shots per second, but alas, I am still taking crapy pictures!

I like to sew, craft, and bake, but I am not really good at any of it. I find a recipe or an idea and go gung ho, but they never turn out the way I picture them. I have a few little things that I can pull off, but I can't tell you how many things that I have finished with a project and thrown away! Can't give that to anyone!!!!!

I just realized something! I have always heard that you dislike or criticize others for things they do when deep down it is the things you dislike in yourself. I am constantly harping on my husband for doing things half way or just enough to get by. It is really deep down something that I dislike in myself! I have no patience therefore I cut corners and do what I need to do to finish whatever I am working on! No wonder everything I set out to do doesn't turn out the way I want it too!

I burn most everything I cook or bake because I am excited about the mixing process and get bored with the completion and it burns. I have gotten better, but that is because my microwave has a timer on it! I love the sewing part of a project, but I cannot cut straight to save my life and that makes it hard to sew in a straight line! I also hate cutting out a pattern. It is boring to make sure the pattern is set set on the grain of the fabric right and it is totally tedious to cut the little triangles that help later when you are trying to line up the pattern. They are totally useful, but take so long to cut out!

So at the age of 35, I am learning that I need to have a little more patience in my life! Maybe I will never be great at everything, but just maybe I can be good at a few things if I start to take a little time and complete all the steps in the process. I need to find joy in the steps!

Friday, April 29, 2011

Motherhood Matters Challenge

KSL's Studio 5 is have a wonderful challenge that I am share with you and challenging you to participate in! It is called the Motherhood Matters Challenge and it is a 10 day challenge from May 2nd to 13th.

Go jump on their site and read about the challenge and take it yourself! I dare ya, you wonderful mother you!!!!!!


This is what I wrote on their blog about my mother:

I am grateful for my mother who taught me the value of hard work. She always said, if it is worth doing, you should not do it half way, in other words, she taught me to do my best at everything. It didn't matter the grade I got or if I won or came in first, what mattered was I did my best. My best was always good enough and if I didn't do my best, I always did it again.

She also taught me to do better for others than I would do for myself. That taught me compassion, service and how to love others. My mother always went without so that her children could have whatever it was they needed and wanted. She also went out of her way to show our friends they were loved and always welcome in our house and in our family activities!

Both of these values are lacking in our world right now and I am extremely grateful my mother had the insight to make sure her children had those skills/values! Thanks mom and thank you, studio 5 for allowing me to share!

Wednesday, April 13, 2011

Cafe Rio at Home!

Since moving to Utah we have found a yummy little restaurant! The name is Cafe Rio and they have to die for Pork! We all love it, but the $45 price tag each time for a family of 4 is killing our budget. So what is a girl to do????? Find a fellow blogger that has cracked the recipe! And I found her!!!!! Her name is Erika and her blog is www.favfamilyrecipes.com. What a wonderful bog with lots of great recipes, but I love that she has cracked the Cafe Rio Secrets!

So here is what we came up with for dinner last night!
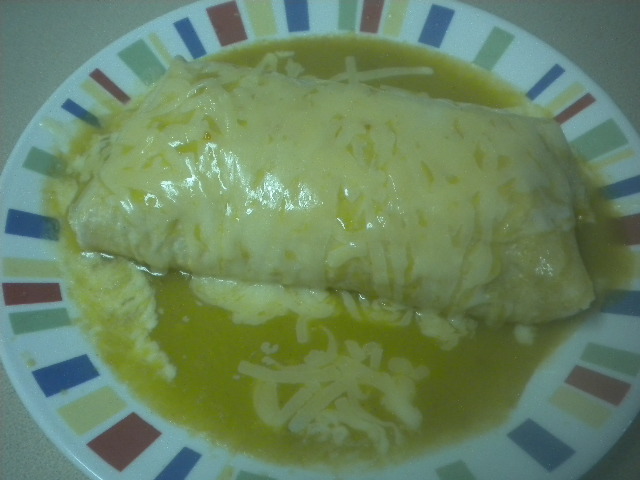
Green Chili Pork Burritos

So here is what you need to make these yummy Burritos:

Burrito sized Tortillas - can use whole wheat
Cilantro Lime Rice - see recipe below
Sweet Shredded Pork - see recipe below
Shredded Jack Cheese
Black Beans - I used Chili Beans and Cafe Rio gives the option of Pinto Beans too
Green Chile Enchiladas sauce or hot sauce

Make sure Pork is heated and Rice is Steamed. I used Canned Beans but you could make your own dried beans. (See Erikas blog for a great Black Bean Recipe. Click HERE)

On a Tortilla, sprinkle cheese, rice, beans and pork on top. Drizzle a little Green Chile Sauce and wrap tortilla (I fold sides in then fold bottom end up and roll over to the top). Place on a plate and cover with Green Chile Sauce and sprinkle with more cheese. Heat in Microwave for about 3 minutes. You could place in a cake pan and bake this for 15-20 minutes in a 350 oven, but I found it just as easy to microwave for 3 minutes on individual plates. Whatever your preference! Serve with chips and salsa or rice and beans and enjoy! Another Tip: If you have picky kids like I do, mash the beans up with a fork and place the meat on top of the beans and they will never know they are there!

Cilantro Lime Rice
I made a few changes:
I did not have fresh Cilantro so I used dried and put it into the rice before I cooked it. I used a few more teaspoons of Lime, but I really like the lime flavor. I also did not have chicken brooth, so I instead used water and a chicken bullion cube. Lastly, I used my rice cooker instead of on the stove! NOTE: With a rice cooker you need to use less water/chicken brooth than the recipe calls for. It needs to be 1 part rice to 2 parts liquid. I used 1 cup rice to 1 cup water and 1 cup brooth for a total of 2 cups liquid. Came out great!

Sweet Pork
I cannot wait to try this recipe, but for our meal last night, I used left over BBQ pork that we had a few nights ago. I added about 1/2 cup of brown sugar to the pork and heated it up. It was great.

BBQ Pork in the Crock Pot
Small Pork Shoulder or Butt Roast (I got mine at Walmart for about $6)
1 jar of honey BBQ sauce
1 tlbs fresh minced basil
1 tlbs minced garlic
1/2 yellow onion minced

Mix bbq sauce, basil, garlic and onion together. Place roast in Crock Pot and pour sauce over. Turn on low and cook at least 8 hours. To get melt in your mouth pork, you want to cook the meat until it is at least 190 degrees. That is when the fat breaks down and makes the meat tender. The meat is done when you take 2 forks and the meat will easily pull apart.

At this point we served the meat on homemade wheat rolls and with potato salad. We used about 1/2 of the meat for our family of 4. The other half of the meat was used for the yummy burritos above. We just added a little brown sugar to sweeten the meat up!

I hope you enjoy these recipes as much as we do! And thanks to Erika at Favorite Family Recipes for the Cafe Rio inspired recipes!

Tuesday, March 1, 2011

Baby Car Seat Canopy


I wish I would have had these when I had my babies! Very cute idea to keep the cold off your baby, but still be able to use the handle of the carseat safely!
I found great instructions HERE. Cluck Cluck Sew has A LOT of great sewing tutorials great for the beginning sewer like me! This project would be great as a baby gift.

Fabric is the key to this one. You don't have to use the baby prints for it to be cute! Go wild! Here are a few that I found that I thought were cute:
Click on the Link to see some Fabric Choice ideas!

I found my fabric at Walmart for a total of $9 for the 2 and 1/2 yards that I got. Joann's and Hobby Lobby will allow you to use 40% off coupon on 1 single cut piece.

I loved the jungle print with the strips on the other side! I think it is perfect for a baby boy!

For the sewing challenged: You can pay me to make you one or....

Get a baby blanket/quilt (that covers the entire care seat)and matching 2 inch wide ribbon. Cut 2-8 inch strips of the ribbon. Figure out where the ribbon will be placed on the blanket where it will lay on either side of the middle of the handle and where the end of the blanket covers both top, bottom and sides of the car seat. Now hand stitch the ribbon on or safety pin onto the blanket. Now tie the ribbons around the handle and you are done!!!!

Monday, February 14, 2011

Cute Valentine's Day Kid Gift

It is called an ilove and it is complete with Kiss headphones! What a great idea. The pink paper is wrapped around a box of the individual conversation heart candies.
What a quick and cleaver Valentine!


Tuesday, November 2, 2010

Pizza!

My Nine year old is trying to finish up the last few arrow points before his birthday and he starts a new scouting den. So we are working on photography. He needs to take at least 3 pictures and tell a story. What a better story than making pizza, from scratch!

Pizza Dough Recipe

2 1/2 cups flour
1 tea salt
1 tlb sugar
2 tlb oil
1 cup warm water
1 package of fast rising yeast or 2 1/4 tea from a jar of yeast

Preheat oven to 425
Stir yeast into water until dissolved
Mix salt and Sugar into Flour
Add Water/yeast mixture and oil to Flour mixture
mix completely and let sit for 5 minutes
Spread out on a greased cookie sheet
Top as you would like
Bake at 425 for 15-20 minutes - depending on toppings
Enjoy!!!!!


This is the Pizza Dough after it has sat for 5 minutes!

It is looking more like a pizza now that it is on the cookie sheet!

Yummy! It is ready to go in the oven to be cooked!

Is is ready to eat! YUMMY!!!! :-)

Some of our favorite variations of pizza include:
BBQ Chicken - Honey BBQ sauce, Monterey jack cheese, and 2 chicken breasts, boiled and chunked
Alfredo Chicken - Alfredo Sauce, pepper jack cheese, and 2 chicken breasts, boiled and chunked, sprinkled with Parmesan Cheese
Taco - taco seasoning packet into tomato sauce, taco flavored meat (1 lb), pepper jack cheese, colby jack cheese, tomatoes, olives, onions, and peppers

Sunday, October 31, 2010

Halloween Craft

I thought these were the cutest little luminaries! Cost for this project - under a buck - if you have tissue paper, construction paper and Mod Podge! Each jar was 25 cents at my local thrift/2nd hand store. You could easily use spaghetti jars or whatever you have around the house. Baby food jars would be so cute. :-)

Thanks to Liz Taylor at:
for the wonderful idea!
and www.sugardoole.net for suggesting this blog!
For How To's follow the link above!

Happy Crafting!!!!!!

Sunday, September 26, 2010

Mint Chocolate Brownies


I love these brownies! My mother-in-law is who turned me on to this addictive sweet treats! I hope you enjoy them too!

Brownie
3/4 cup butter, softened
1 1/2 cup sugar
3 eggs, beaten well
3/4 cup flour, sifted
1/3 cup cocoa, sifted
1/2 tsp salt
1 tsp vanilla
1/2 cup walnuts, optional

1. Preheat Oven to 325. Grease and dust with flour, 9x13 pan.
2. Cream butter and sugar together.
3. Add in beaten eggs.
4. Add cocoa, flour and salt.
5. Fold in Vanilla and Nuts.
6. Bake in preheated oven for 20 minutes.
7. Completely Cool.

Mint Filling
1 stick butter, softened
2 cups powdered sugar
1/2 tsp mint extract
2-3 drops green food coloring
1 tbsp water

1. Cream together butter and sugar.
2. Blend in mint extract, green food coloring and water.
3. Spread over cooled brownies.(Tip: place brownies in freezer for 30 minutes then frost. You frosting will less likely pull top layer of brownies that way)
4. Refrigerate for 30 minutes of until set.

Chocolate Topping
1 package of chocolate chips, you can use mint chocolate chips
1 stick and 1 tbsp butter

1. Slowly melt chocolate chips and butter over low heat or in microwave.
2. cool for 30 minutes, stirring occasionally.
3. Spread over mint filling.
4. Refrigerate until set (don't over cool it for it will be impossible to cut up and still look pretty)!

NOW ENJOY!!!!!!!

Tomato Basil Soup for the Birthday Soul!


I love Tomato Basil Soup! There was a restaurant in Dallas called Souper Salad where I got my first bowl of the delicious soup. It is amongst the best of comfort food in my opinion! After I left Dallas, oh how I missed that soup. Safeway, the Grocery Store, had a version of the soup, but it was chunky. It was good but creamy is better! When we moved to the Rocky Mountains, guess what I found! Souper Salad! I was delighted until I found out Tomato Basil Soup was not on the menu anymore! So I have set out to find a recipe for my beloved Tomato Basil Soup! I hope it is good!


Ingredients

  • 4 tomatoes - peeled, seeded and diced (I like to add a can of Stewed Italian Tomatoes for more flavor)
  • 4 cups tomato juice
  • 14 leaves fresh basil
  • 1 cup heavy whipping cream (might need 1/4 to 1/2 cup more if you added canned tomatoes)
  • 1/2 cup butter
  • salt and pepper to taste

Directions

  1. Place tomatoes and juice in a stock pot over medium heat. Simmer for 30 minutes.
  2. Puree the tomato mixture along with the basil leaves (I used my blender, but you could use a food processor too), and return the puree to the stock pot.
  3. Place the pot over medium heat, and stir in the heavy cream and butter.
  4. Season with salt and pepper. Heat, stirring until the butter is melted. Do not boil.
  5. Serve inside a bread bowl or with my favorite, grilled cheese sandwiches!!!!
  6. Of course, this Soup is great on its own or you can add parmesan cheese, sour cream, pasta, etc. The possibilities are endless.

Thanks to www.allrecipes.com for the base recipe of this soup!!!!
And to Souper Salad for the start of this love affair!

Lesson Learned: When you pour something hot into the blender - don't turn it on high! You will have a big mess to clean up and a few burns - and a few laughs!

Take Out Menu for Playfood


My daughter just loves the playfood that she got with her birthday and loves to pretend that she is a chef at a restaurant. She wanted to make a menu so that she could serve her guests - so we did! He is the generic version! So fun! Bon Appitet!

Saturday, September 18, 2010

Trying my hand at sewing - with playfood!

When I was about 7 or 8 years old, my maternal grandparents gave me a little kitchen hutch. It was beautiful. It was made out of wood and was something that my grandpa had refurbished for me. My grandpa died just just a year or so later. It is one of the last gifts he gave to me. I was also given a tea set. I remember the tea set - it was green and white which were my favorite colors at the time (funny - green still is).


When I got married, 10 years ago, I left my little hutch behind hoping if I ever had a little girl, I would be able to give it to her. Well my wish finally came true this summer. We were moving from the great northwest to the rocky mountains and my family came to help and they brought the hutch with them. When we settled into our new home, I was able to give it to her. She loves it. She has some dishes and plastic food, but nothing she wanted to play with. She asked for some more food so she could cook!

A few weeks later, my little girl would be turning 8 so I thought is was a perfect time to get her some more play food and a few more dishes and a few pots and pans. Did you know it is really hard to find non plastic playfood and if you do, you pay an arm and a leg for it! Being the thrifty person I am, I set out to make my own. I found many websites and blogs that were very helpful. At the bottom of this post will be the links to those pages!

So we start with Strawberries!


Anyone want a cheeseburger and fries????


Bowtie Pasta with Sauce and Carrots


The old lunch standby - peanut butter and jelly with orange slices!


Pancakes and eggs with bacon - yummy!


This was a fun project and fairly easy since I am about the worst seamstress on the planet! I used measuring cups and canisters as templates for many of the patterns. A rotary cutter and mat were an accentual part of the project since I cannot cut straight either! THe clear thread that I found at my local fabric store was the best find of this entire project! I love it! No more changing thread colors for me!!!!!

Thanks to the following for the patterns and ideas:
http://theadventuresofroryandjess.blogspot.com/
http://helpinglittlehands.blogspot.com/
http://melissagoodsell.typepad.com/day_to_day/
http://oneinchworld.com/blog/

Saturday, September 11, 2010

Remembering 9/11


I think 9/11 will be one of those events that my generation will never be able to forget. It is one of those "I remember exactly where I was and what I was doing when it happened" moments!

For me, I had a 10 month old baby boy and we were going to school. My hubby was already up and gone to his early morning class and I was up feeding the baby. As part of my morning ritual, I was watching the weather channel except they were not showing any weather. All they talked about is all the airports shutting down and what a national tragedy this was. I couldn't for the life of me understand what they were talking about. Then I turned it to one of the national news channels and there it was. One of the Towers was on fire. About 2 minutes later, I actually saw the 2nd plane slam into the other tower. I sat there in shock, holding tight to my baby. I could not believe what I was seeing. Then towers fell and all the other events unfolded and I really think I sat on my couch for most of the day in shock.

I think the entire county was in shock, but we were united. We came together as a country, united, wanting to defend those who were innocently killed. We wanted to rally around those families who lost loved ones. We were united in being America - however you looked at it. Fast forward 9 years later. We are anything but united. We are divided politically, racially, religiously - almost every way! There are even conspiracy theories out there that say 9/11 was not a terrorist attach, but a government cover up.

It is hard for me not to get caught up in the politics. I get angry about some of the things being said and done - by both sides. I then remember my faith and what I have been taught. I know this has to be.

So I say lets just take today, 9/11 and honor those who lost their lives. Let's honor those families who go on without loved ones. They have made ultimate sacrifices. I, personally choose to fly a flag today - to honor the lost, the left behind, the rescue workers, and the soldiers who fight so I can sit here and express my thoughts freely. Thank you and God bless you, all!

Starting this Journey

Well...I have thought a lot about starting this blog for many months now. So many of my friends have awesome blogs where they share their creative sides. So I thought, I am somewhat creative and every once in awhile have something I can share so here we are! I hope you enjoy the things that make my journey happy!